Drawing a flower becomes much easier when you stop thinking about the finished bloom and begin with a few light construction shapes. In this flower drawing tutorial, you will build a balanced center, arrange simple petals around it, add a curved stem, and finish the sketch with natural leaves and gentle shading.
The lesson is designed for drawing flowers for beginners, but the same method can also be used as the foundation for more detailed floral illustrations. You only need a pencil, paper, and an eraser to complete the basic version. By the end, you will have a simple flower drawing that can be left as clean line art, shaded with graphite, or finished with colored pencils.
Flower Drawing Tutorial Overview
- Difficulty: Beginner
- Estimated time: 20–30 minutes
- Number of steps: 9
- Main medium: Graphite pencil
- Worksheet: Free printable PDF available
- Main skills: Symmetry, curved lines, overlapping forms, line weight, and simple shading
What You Will Learn
This basic lesson shows how to turn a small center guide into a complete bloom. You will learn how to compare opposite petals, control their spacing, and avoid the stiff appearance that often comes from drawing every shape exactly the same.
You will also practise building a stem with two flowing lines, shaping leaves around a central vein, and using light shadows to separate overlapping forms. These steps are useful for anyone searching for an easy drawing of a flower or a flower step by step drawing that does not require advanced art experience.
Once the main lesson is complete, you can adapt the same construction into a flower plant drawing, a bouquet, or several other easy floral ideas.
Materials Needed
You do not need expensive supplies for this tutorial.
HB pencil
An HB pencil is useful for the first construction lines because it can produce light marks that are easy to erase.
2B pencil
A 2B pencil creates darker values for petal folds, leaf shadows, and the final outline.
Eraser
Use a clean eraser to remove the center guides and any lines hidden behind overlapping petals.
Drawing paper
Smooth drawing paper makes it easier to create clean curves. Standard printer paper also works for practice.
Black fineliner
A fineliner is optional. It can be used after the pencil drawing is complete if you want a bold ink outline.
Colored pencils
Colored pencils are useful for adding layered color while keeping the original pencil construction visible.
Before You Start
Place the paper so there is enough room above and below the bloom. The flower head should sit slightly above the center of the page, leaving space for the stem and leaves.
Begin with very light pencil pressure. Early lines are only guides and will be corrected later. Drawing flowers for beginners becomes much easier when the first shapes are pale enough to erase without leaving marks.
Use a small center circle to control the size of the bloom. Each time you add a petal, compare it with the petal opposite it. The shapes do not need to be perfectly identical, but their overall length and spacing should feel balanced.
This approach works well for beginner simple flower designs for pencil drawing because it separates the subject into clear, manageable parts.
Step-by-Step Flower Drawing
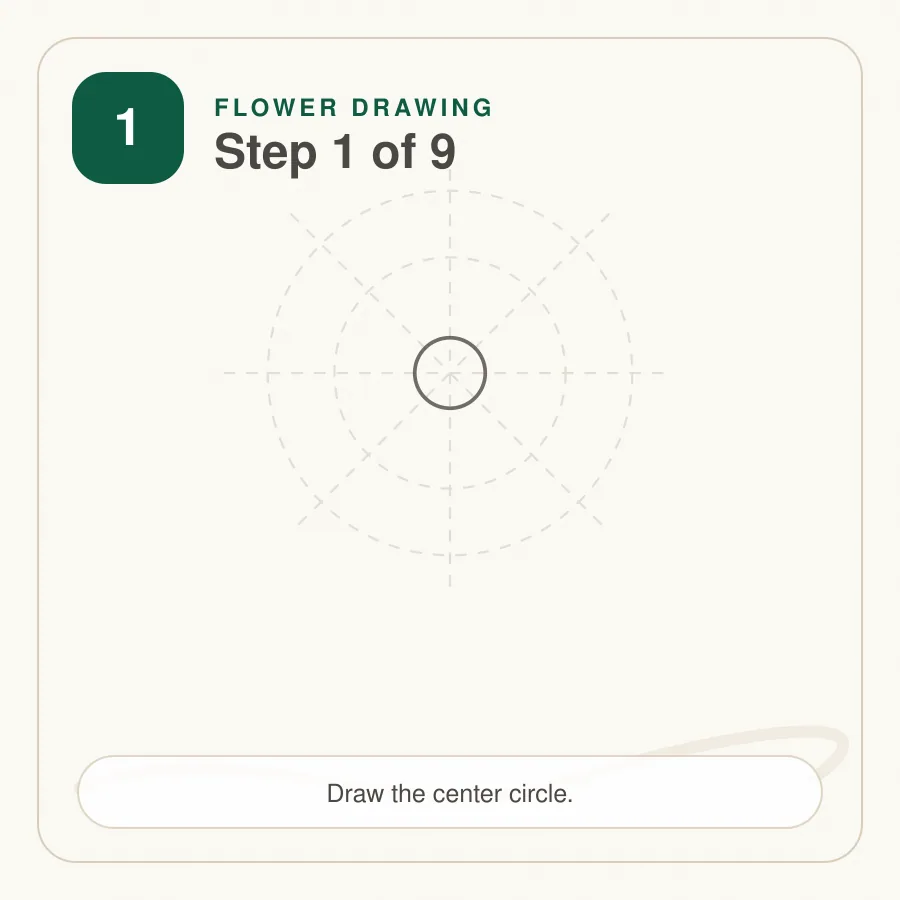
Step 1: Draw the Center of the Flower
Start with a small circle slightly above the middle of the page. This circle will become the center of the bloom and will control the position of every petal around it.
Keep the outline light and avoid tracing over it repeatedly. A clean guide is easier to work around. The circle does not need to be mathematically perfect; a slightly uneven shape can make the final flower feel more natural.
Tip: Leave enough empty space around the circle for petals that are two or three times longer than the center radius.
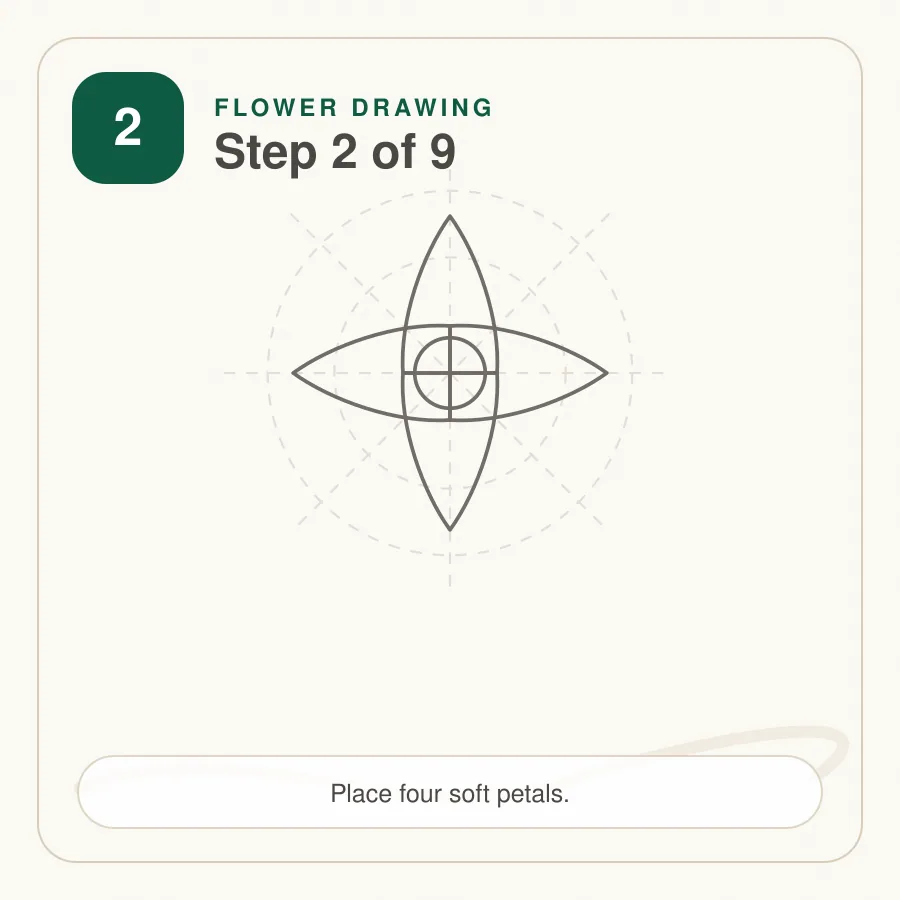
Step 2: Add Four Main Petals
Draw one petal above the center, one below it, and one on each side. Use soft teardrop shapes that narrow where they meet the center and widen toward their outer ends.
These four main petals act like anchors. They divide the bloom into equal areas and make it easier to place the remaining petals. Compare the top and bottom petals first, then check the two side petals.
Tip: Turn the paper while drawing the curves rather than forcing your wrist into an uncomfortable angle.
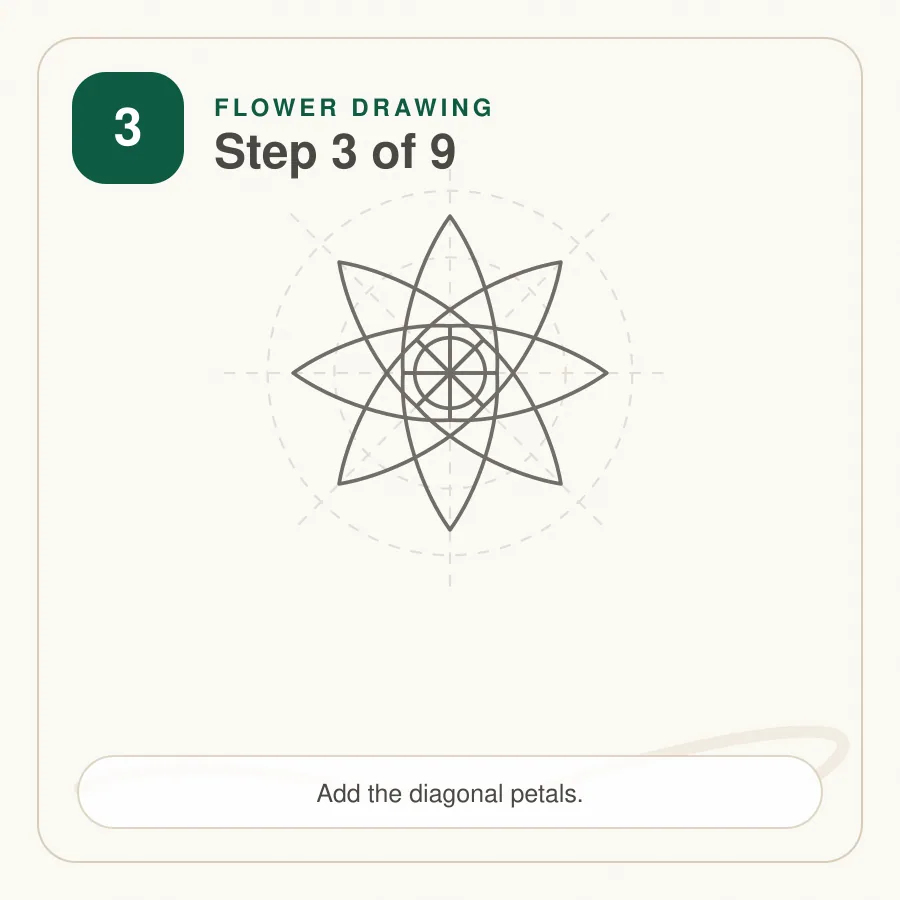
Step 3: Fill the Spaces With More Petals
Add another petal between each of the four main petals. The new shapes can be slightly smaller or more curved so the bloom does not look mechanical.
Let the base of each petal meet the center circle. Avoid leaving wide empty gaps, but do not crowd the petals so closely that their outlines become difficult to read. This stage is important when drawing flowers step by step because the spacing creates the overall rhythm of the flower.
Tip: Add one new petal, then draw the petal opposite it before moving to the next gap.
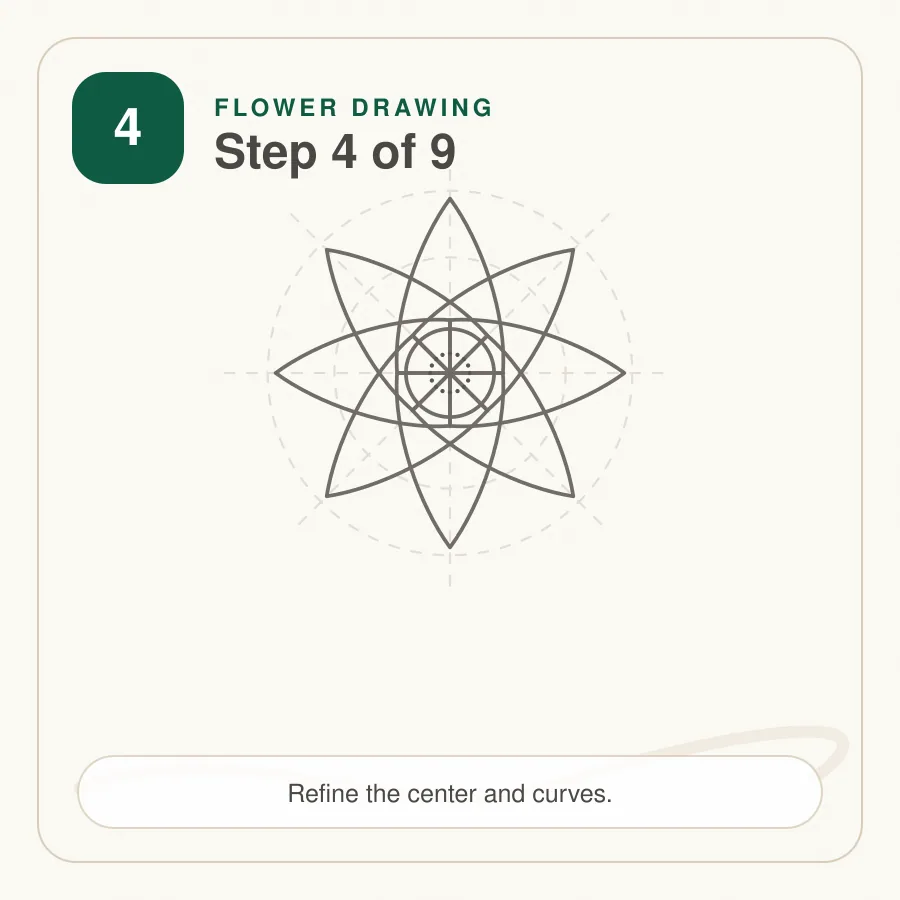
Step 4: Refine the Petal Shapes
Look at the outer edge of the bloom and correct any petals that appear too narrow, too wide, or much longer than the others. Replace stiff curves with softer contours.
Natural petals often have small differences in their bends and tips. One may lean slightly left while another folds inward. These variations help the sketch feel organic without losing the simple structure.
Erase unnecessary overlaps near the center, but keep a few subtle crossings where one petal sits in front of another.
Tip: Avoid making every petal identical. Balanced variation looks more believable than perfect repetition.
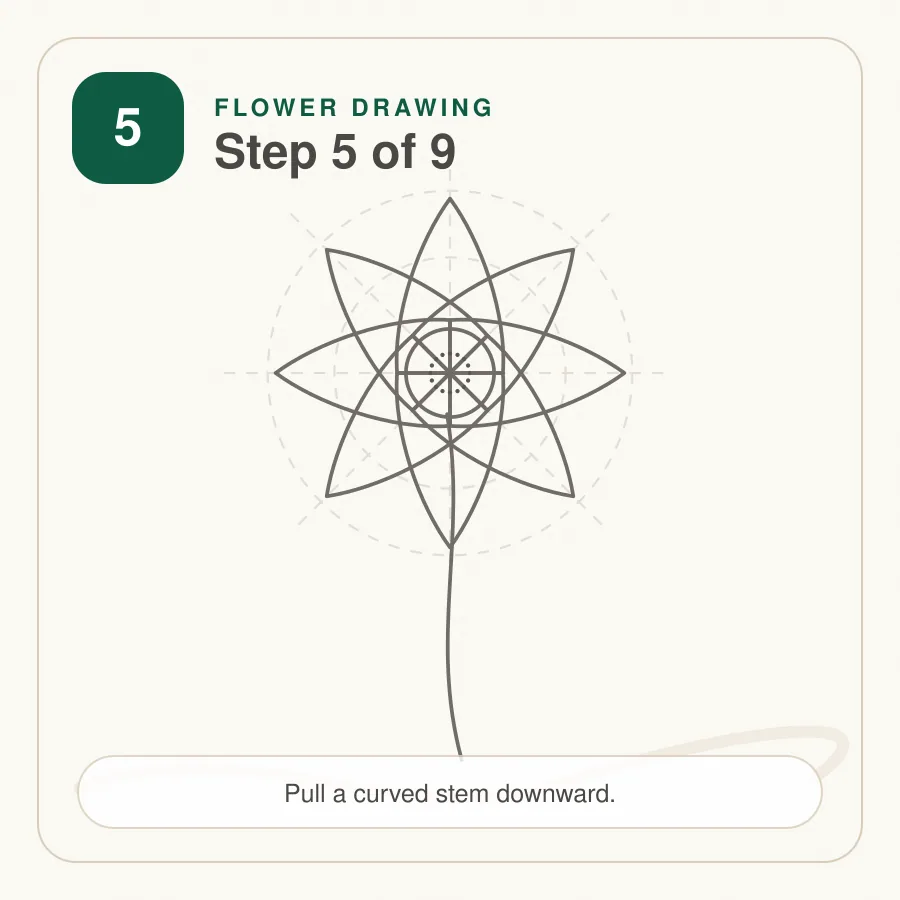
Step 5: Draw the Stem
From the lower part of the bloom, draw a gently curved line moving downward. Add a second line beside it to create the width of the stem.
The two lines should remain narrow but should not be perfectly parallel. Let the stem become slightly thinner as it approaches the flower head. A subtle curve gives the flower a more natural posture than a rigid vertical stem.
Tip: Check that the stem visually supports the center of the bloom instead of attaching too far to one side.
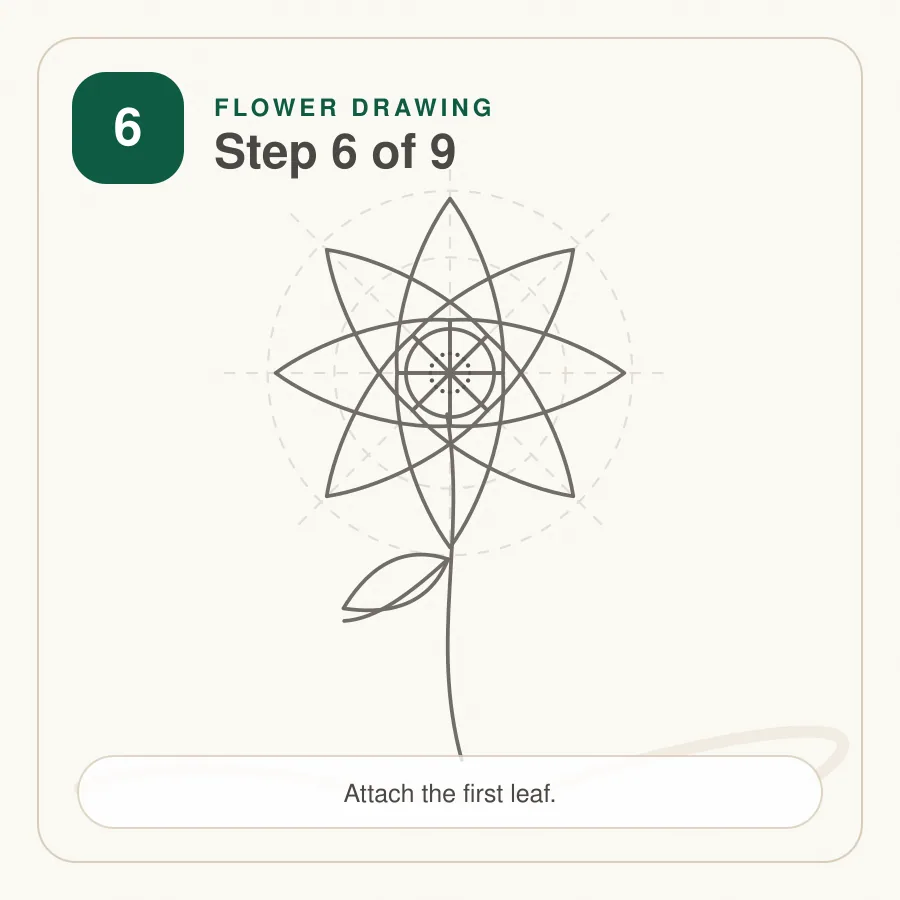
Step 6: Add the First Leaf
Choose one side of the stem and draw a curved center vein extending outward. Build the leaf around this line with two tapered curves that meet at a pointed tip.
The leaf should be large enough to balance the flower head but not so wide that it becomes the main subject. Let its base connect smoothly to the stem.
Tip: Draw the center vein first. It provides a clear direction and makes the outer leaf shape easier to control.
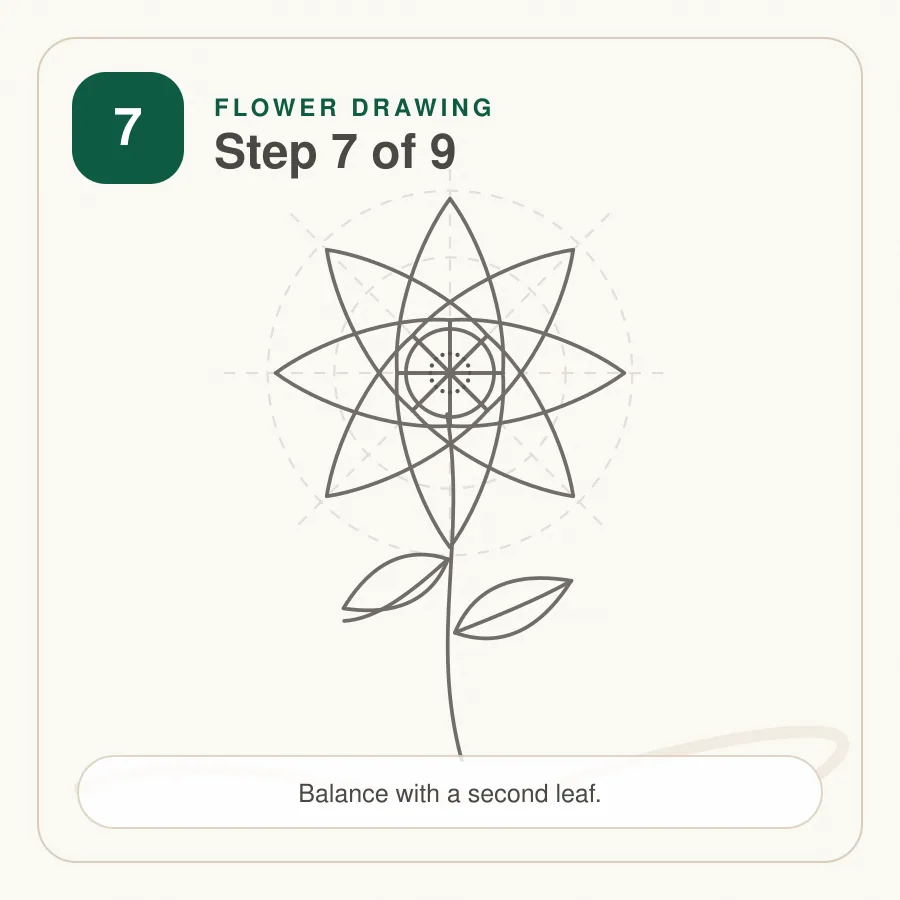
Step 7: Add the Second Leaf and Veins
Place a second leaf on the opposite side of the stem, slightly higher or lower than the first. Changing the position prevents the design from looking overly symmetrical.
Add a central vein inside each leaf, followed by a few smaller veins that angle toward the outer edges. Keep these lines lighter than the main outline.
This stage can also be expanded into a flower plant drawing by adding more leaves, a second stem, or a small unopened bud.
Tip: Keep the smaller veins curved and spaced apart rather than drawing them as a rigid pattern.
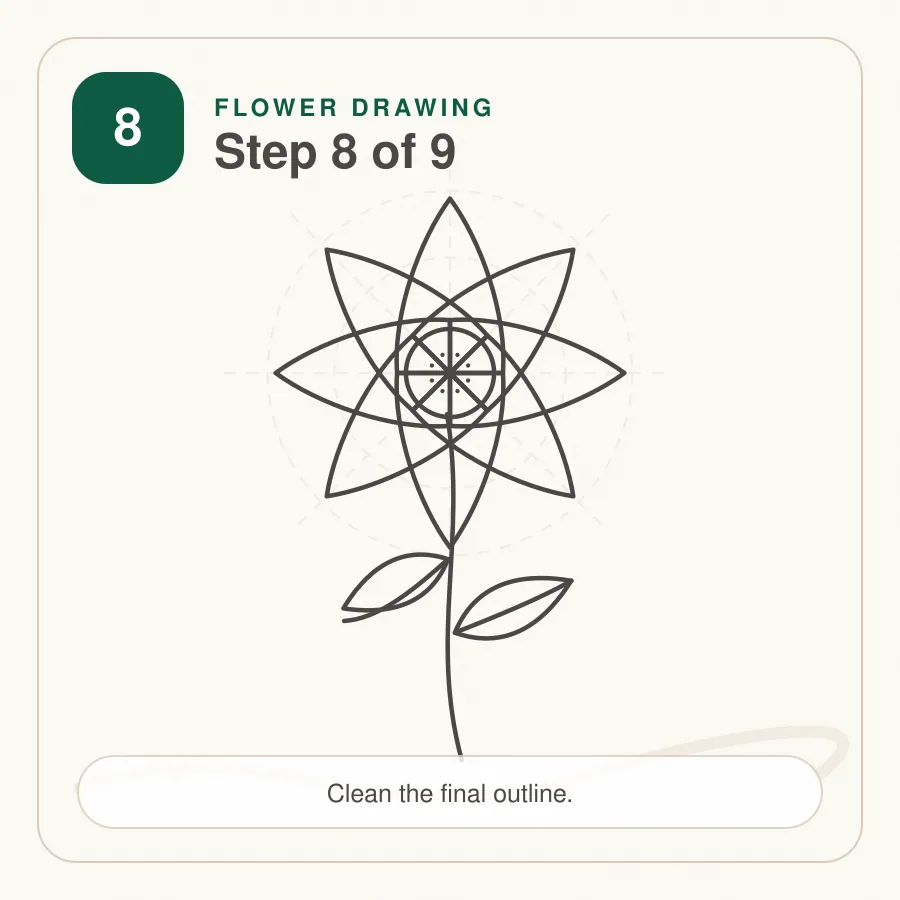
Step 8: Clean the Construction Lines
Erase the original center guide where it is hidden by the petals. Remove any stem lines that pass through the bloom or leaves.
Review the drawing as a complete silhouette. Correct uneven petal lengths, soften the leaf edges, and make sure the stem does not suddenly change width.
After the corrections are complete, strengthen the important contours with slightly darker pencil pressure. Keep some lines lighter so the sketch retains a natural quality.
Tip: Step away from the page for a moment, then return and check the balance with fresh eyes.
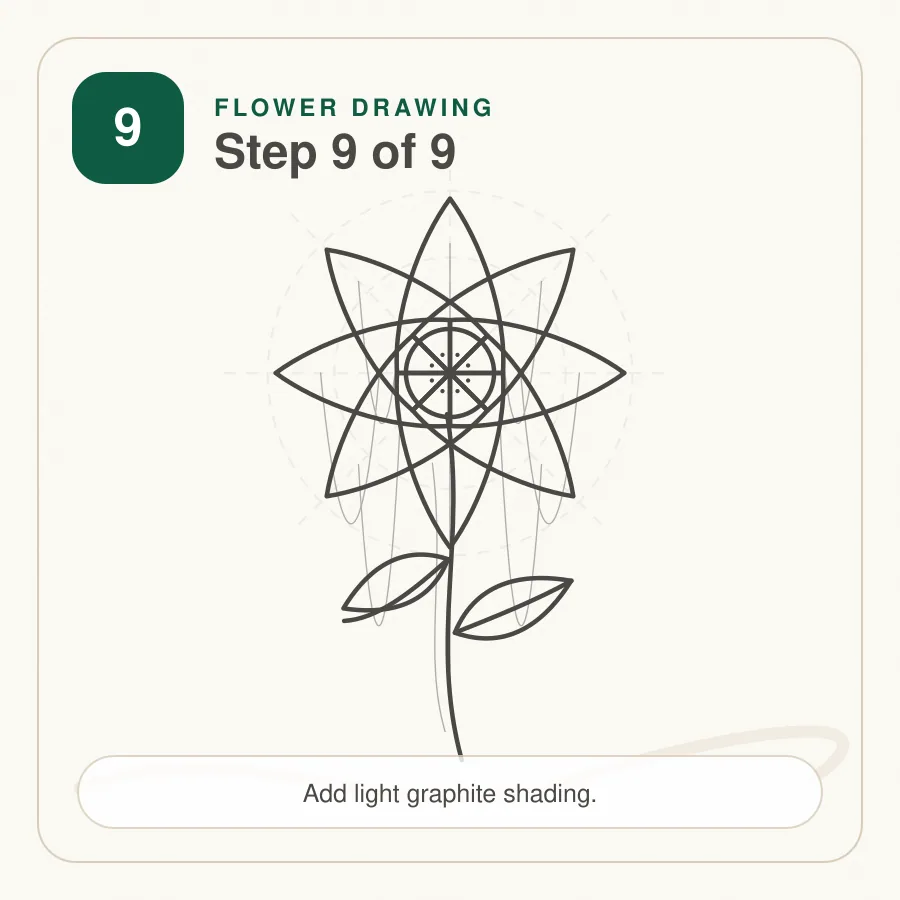
Step 9: Add Shading or Color
Choose a light direction before shading. Darken the base of each petal where it meets the center and add soft shadow beneath any overlapping edges.
Shade one side of the stem and place a little darker value beneath the leaves. The leaf veins should remain visible but should not be outlined heavily.
For a colored version, begin with pale layers and gradually increase the saturation near petal folds, the flower center, and the lower parts of the leaves.
Tip: Preserve a few light areas on the petals to suggest highlights and keep the bloom from looking flat.
How to Make a Flower Drawing Easy and Beautiful
A result that is easy and beautiful usually depends more on clean structure than on complicated detail. Start with a small center, keep the petals evenly distributed, and avoid pressing hard until the proportions look correct.
Petal spacing is especially important. If several petals overlap in one area while another part of the bloom has large gaps, the flower may appear unbalanced. Compare opposite sides and adjust the outline before adding shading.
Use darker line weight near the center, beneath overlapping petals, and on the shadowed side of the stem. Keep the outer petal edges lighter. This small change creates depth while preserving a sketch simple enough for a beginner.
Do not add veins, texture, and heavy shadows everywhere. A simple easy floral sketch often looks cleaner when the detail is concentrated near the center and gradually reduces toward the outer edges.
Simple Flower Drawing Variation
For a quicker version, reduce the lesson to five basic stages:
- Draw a small center circle.
- Add five rounded petals.
- Draw one curved stem.
- Add two simple leaves.
- Trace the final outline and erase the guides.
This simple variation works well for younger learners, quick sketches, greeting cards, and notebook decorations. The petals can be rounded rather than pointed, and the leaves can be drawn without interior veins.
The same approach covers the intent behind simple flowers drawing, flowers simple drawing, and simple drawing flowers without requiring separate pages. All of these searches are looking for a straightforward floral result with fewer details.
Flower Plant Drawing Variation
To turn the single bloom into a small plant, add another curved stem rising from the same base. Place a smaller flower or unopened bud at the top of the new stem.
Add several leaves at different heights and angles. A short ground line can help the plant feel connected to the page rather than floating in empty space.
You can also draw three small blooms together to create a drawing of flowers. Overlap the stems, vary the height of each bloom, and keep the largest flower near the center. This method also works for flowers and plants drawing compositions and a drawing of flowers arranged as a small garden cluster.
Easy Flower Drawing Ideas to Try Next
Once the basic lesson feels comfortable, try one of these easy ideas:
Single daisy-style flower
Use a wide center and several narrow petals arranged evenly around it.
Three-flower bouquet
Draw one large bloom and two smaller flowers with crossing stems.
Flower in a pot
Place the stem inside a simple plant pot and add several leaves near the base.
Floral border
Repeat small flowers and leaves along the edge of a card or notebook page.
Wildflower cluster
Draw several thin stems with different small blooms at the top.
Flower with a butterfly
Add a small butterfly beside the petals to create a more decorative composition. You can continue with the butterfly tutorial after the bloom is complete.
Flower wreath
Arrange small flowers and leaves around a light circular guide.
Floral bookmark
Create a narrow vertical composition with one main flower, leaves, and small buds.
These ideas cover related beginner floral searches while keeping the content on one useful tutorial page.
How to Refine the Final Drawing
Begin by checking the overall proportions. The bloom should feel large enough to lead the composition, while the stem and leaves should support it.
Erase any hidden construction lines that remain inside the petals. Correct petals that are much wider or narrower than the surrounding shapes. Small differences are natural, but one shape should not unintentionally dominate the bloom.
Vary the line weight instead of tracing every contour with the same pressure. Darker lines can be used beneath overlapping petals, around the lower side of the center, and where leaves connect to the stem.
Keep the leaf veins softer than the outer contour. Too much contrast inside the leaves can distract from the flower head.
Preserve a few light areas around the petal tips. These highlights help separate the forms and make the graphite shading easier to read. Review basic shapes if you want more construction practice before shading.
Shading and Coloring the Flower
Decide where the light is coming from before adding dark values. A light source from the upper left means the lower-right side of the center, petals, stem, and leaves will usually receive more shadow.
Darken the petal bases because they turn inward toward the flower center. Add narrow shadows beneath overlapping petal edges, but allow the values to fade toward the tips.
Shade the stem with curved pencil strokes that follow its vertical form. The shadow should be slightly stronger beneath the flower head and beside the leaves.
For colored pencil, apply the lightest color first. Add stronger color near folds and overlaps, then use a lighter pencil to blend the transition. Leave selected areas pale to preserve highlights. For more value control, see pencil shading.
Common Flower Drawing Mistakes
Pressing too hard at the beginning
Dark construction lines are difficult to erase and can remain visible in the final artwork.
Making every petal identical
Perfect repetition often makes the flower appear stiff and artificial.
Crowding the petals
Too many narrow petals can make the center difficult to read.
Drawing a perfectly straight stem
A subtle curve usually creates a more natural plant posture.
Making the leaves too large
Oversized leaves can compete with the bloom for attention.
Using heavy outlines everywhere
Uniform dark lines flatten the drawing and remove visual hierarchy.
Shading without a light direction
Random dark areas make the petals and leaves look inconsistent.
Tips for Drawing Flowers for Beginners
- Use light construction lines until the entire flower is correctly placed.
- Build the bloom from the center outward.
- Compare opposite petals rather than drawing around the circle without checking.
- Rotate the paper to create smoother curves.
- Keep the stem narrow and slightly curved.
- Add only a few leaf veins.
- Practise the same basic bloom several times before adding complex details.
Beginner simple flower designs for pencil drawing improve through repetition. Each attempt will make it easier to control petal spacing, line weight, and overall composition.
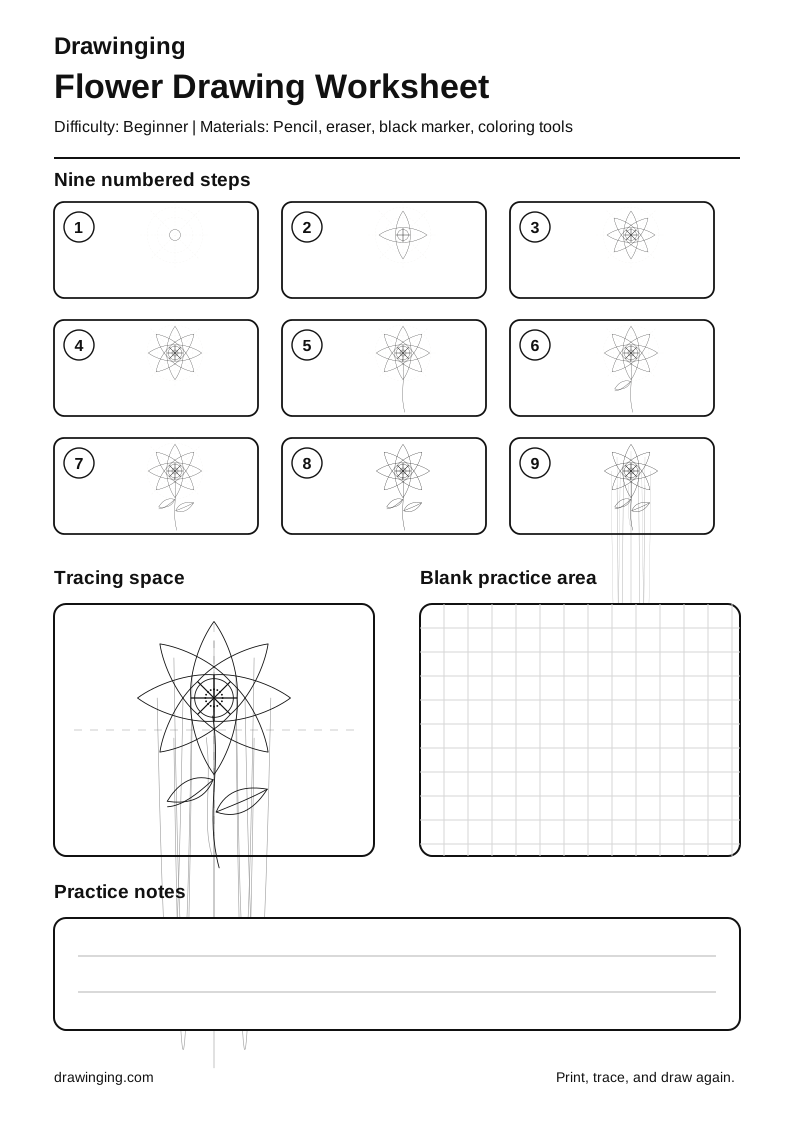
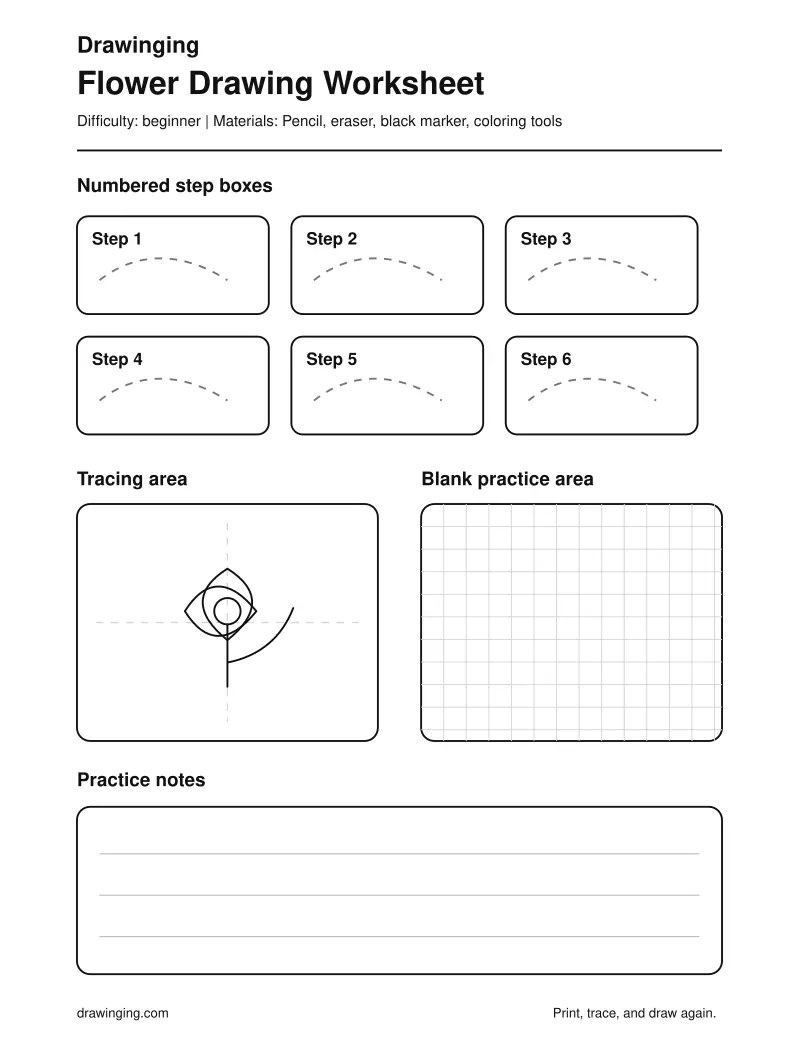
Download the Flower Drawing Worksheet
Use the printable worksheet to practise the same nine-step process on paper.
The worksheet includes:
- nine numbered step boxes
- a tracing exercise
- a blank drawing area
- a simple materials reminder
- a finished flower reference
- printer-friendly black lines
Download the Flower Drawing Worksheet PDF
Related Drawing Tutorials
After completing this lesson, continue with these related guides:
- Learn how to draw a layered rose
- Try a sunflower with pointed petals
- Draw a hibiscus flower
- Practise a simple tulip
- Add a butterfly beside your flower
- Compare animal construction with a cat sketch
- Explore more flower drawing tutorials
Frequently Asked Questions
What is the easiest flower to draw?
A simple five-petal flower is usually the easiest starting point. It uses one center circle, five rounded petals, a narrow stem, and two basic leaves.
How do beginners draw a simple flower?
Beginners should begin with a light center guide, add opposite petals, fill the remaining spaces, and draw the stem only after the bloom is balanced.
How can I make flower petals look balanced?
Compare each petal with the one opposite it. Check their length, width, and spacing before darkening the outline.
Which pencil is best for a flower sketch?
An HB pencil is useful for light construction, while a 2B pencil can create deeper shadows and stronger final lines.
How do I turn one flower into a flower plant drawing?
Add a second stem, a smaller bloom or bud, more leaves, and a short ground line. Vary the heights so the plant feels natural.
Can I print the flower drawing worksheet?
Yes. The worksheet is available as a downloadable PDF and SVG. It includes step boxes, tracing space, and a blank practice area.
Final Thoughts
A successful flower drawing begins with light construction, balanced petals, and simple plant forms. Focus on the center, compare opposite shapes, and delay dark outlines until the proportions feel correct.
Use the downloadable worksheet to repeat the nine steps and improve your control over curves, line weight, shading, and leaf structure. Once the basic design feels comfortable, explore the related rose, sunflower, hibiscus, tulip, and butterfly tutorials to build a wider collection of floral drawings.